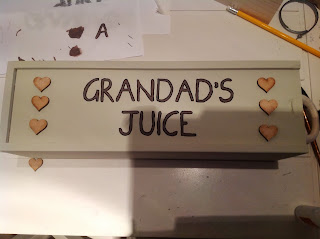
Remember that wine box I bought from the car boot sale a couple of weeks ago? Well, I found some time to decorate it. I decided to try decorating by hand using the retro-school tracing technique. I'll show you how....
I started by painting the box using a sample pot of coloured emulsion paint from B&Q (£1.10 a tub) in olive green. I gave it two thin coats, but I think one would have been fine. I decided not to paint the I side of the box as I will fill it with straw to present the wine so it wouldn't be seen anyway. Actually, the truth is I was too keen to crack on with it. If I were to sell this I think i'd paint the inside too.
Using Microsoft publisher I created a rectangle shape the same size as the lid on the box. This meant I could position the text and resize the font so that it was central and looked good. I messed around with the font until I found one I was happy with and then printed it off and cut it out. I deliberately choose a skinny font. I wanted it to look like handwriting, but neat.
I then coloured over the back of the writing with a pencil. This gave me flashbacks to rainy schools spent tracing ridiculously detailed images from textbooks and transferring them into exercise books.
Once coloured I turned it back around and stuck it in place on the lid using a piece of masking tape. This ensured the paper stayed in place as I tried to trace it into my box. I then drew around each of the letters using a biro which transferred the pencil markings underneath to the wood.
I peeled away the paper to reveal the writing in light pencil.
I carefully coloured in the writing with a super fine paintbrush. This was my main mistake. I really do not have a stead enough hand for a paintbrush. Really I should have used my uni posca paint pens, but they don't offer the variety of colours I want to work with. So, I either need to learn to steady my hand, find an super-duper-fine paint brush, or fork out for a bucket load of paint pens from somewhere. Practise makes perfect as they say....
It didn't look great. It looked unfinished. I umm'ed and arr'ed for ages about whether to go Around the letters with a black marker or not. Eventually I decided that since I didn't like it as it was, I couldn't make it worse. So I went ahead. Still, it looked "dodgy" to say the least. I persevered with it as i thought whilst it looked a bit odd, once finished it may add character. I'm glad I did because I actually really like the finished item.
The next decision was the embellishments. It definitely needed something but I couldn't decide what looked best:
Finally I bit the bullet and went for the stars. I painted them in the same colour I'd used for the letters, outlined them using my fine liner too, and then stuck them on using superglue. Voila!


No comments:
Post a Comment