Thursday, 26 September 2013

Dog loving uncle's birthday card

I can not take all the credit for today's card I'm afraid. The hard work was done by my little boy. It's my younger brither's birthday today and I've made a rule that I will not buy any more cards but make them myself. 

The boys love dogs also but I refuse to get one. So they have to settle for going out with my brother while he walks his dogs. The kids love it.

I made this by stamping a clear stamp from hobbycraft with black Stazon and leaving my little boy to colour it in. I stamped the sentiment using blazing red Stazon just to add a bit more colour as it became obvious Toby wasn't in the colouring mood. The picture and sentiment were layered on blue card and a couple of buttons stuck on to fill the blank space. Toby then scribbled his birthday wishes inside the card using great thought, detail and a blue felt tip pen! 

I personally love it! :o)


Tuesday, 24 September 2013

Modge Podge and Decopatch

Today I decorated a vase and some tumbler glasses with decopatch papers. This is great fun! 


I bought the vase from hobbycraft in the sale a little while ago for £1.49 and the tumblers are from an asda value box of glasses. My intention is to use the tumblers as tea-light holders. I was a bit apprehensive about whether they would withstand the heat so I have tested them by leaving a candle to burn in them and they didn't crack under the heat (literally). However if you attempt to do the same I should advise that you also check the glass and leave it to cool down before touching it. I TAKE NO RESPONSIBILITY FOR MISHAPS USING GLASSES AS TEA-LIGHT HOLDERS!!!!

To make I simply ripped the decopatch paper up into 50p sized pieces. I turned the vase upside down and started at the top (bottom of the vase). I used a decopatch brush to paint on some modge podge then applied the paper, brushed out any bubbles and applied a thin coat of modge podge over the top. I continued to do this, overlapping each piece of paper slightly. Once covered I left to dry for a couple of hours.  I took a sharp craft knife and ran it closely around the base and top of the vase to cut away the edges leaving it smooth and neat.


I really like it, but you can see the difference between the pink vase and the clear glass. I have 4 other vases which I think I'll just decorate and sell on by itself rather than as a set. I'd be a bit worried to sell the tea-light holders in their new form for health and safety reasons. This lovely little set sit pretty in my girly spare room.

Monday, 23 September 2013

Work in progress

Unfortunately I only have my work in progress to show today as I have been busy painting my wooden shapes from Wood Be Nice:

Sunday, 22 September 2013

Free standing blackboard

Right then, I am back and ready to blog. I am expecting to go for surgery on Tuesday but at least if I'm back on the blogging bandwagon I can catch up and write some scheduled blogs while I'm in hospital.

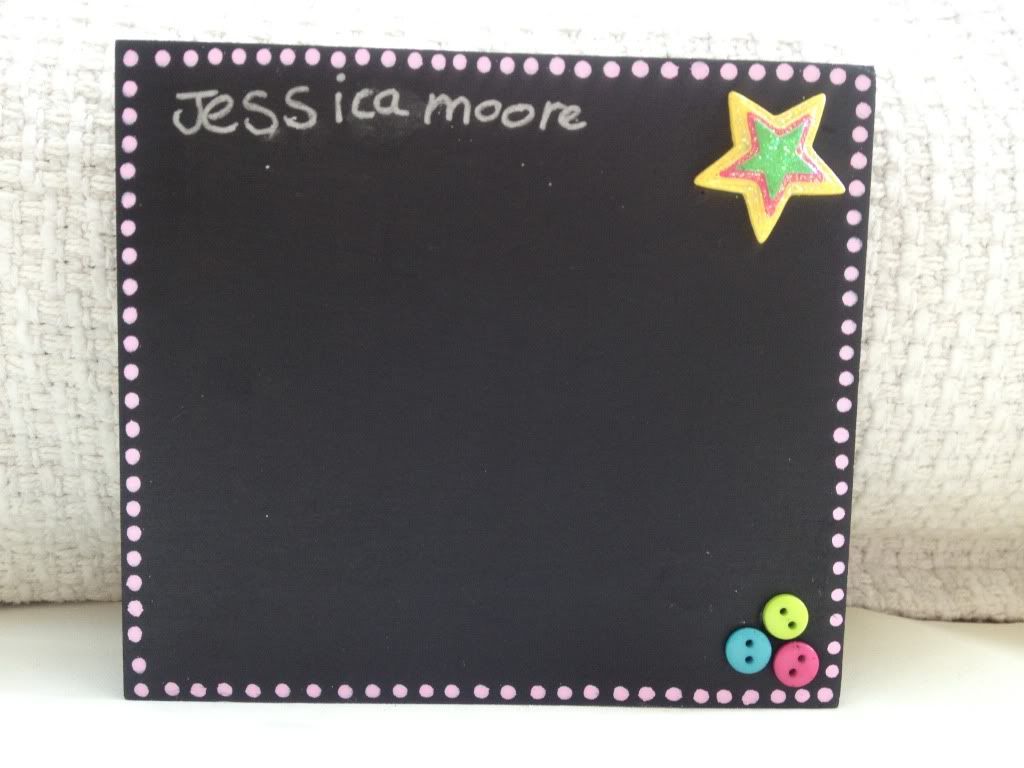
So just a quick one to get back into things. My 6 year old niece is always really interested in what I have made and how I have made it. Today Simon took the boys to Manchester airport to see the aeroplanes so I had a bit of time to rest/tidy up. I'd just finished packing up a box of crafty bits to take upstairs when my brother arrived with my niece and nephew. She asked if I'd been crafting and    Since I've been unwell I've not actually made anything. I did however have a heart shaped chalkboard on the table that I'd finished a little while ago, but needed to drill holes in, so I showed her that. She wanted to k ow how I made so I explained. She seemed AMAZED!! Bless her

I had a scrap piece of MDF on the table which was actually used as a DIY wedge but thought would be good to let her play with. She put 3 layers of chalkboard paint on, covered the sides and back and played around with a handful of embellishments I gave her until she decided on how she best liked them placed. I did help her by doing the dotty border and sticking he bits down (as I use superglue) but it was entirely her design. She, of course, added her name. She left the house with her stick of chalk and wet wipe a very happy little girl. And I waved her off a happy aunty! Here is her creation:


Saturday, 14 September 2013

Bad blogger!!!

I have been a very bad blogger this last few weeks....I haven't written one blog!

Unfortunately we've had a rough time of late. My grandmother has become unwell, my little boy has had his cleft palate repair, and I've been unwell with a stinking flu as well as having random gallstones attacks!!

I will be resuming my blogging ASAP with some lovely new makes.

Just arriving at Alder Hey
Keeping busy before the op


The morning after his operation. Brave little monkey x

Wednesday, 21 August 2013

Decorating wooden shapes

I have somewhat neglected my blog this last week as I had a friend visiting. She and her sister were instrumental in me meeting my partner Simon and we've got lots of great memories together as a group. She adores the boys and it's lovely to see them interact with other people.


We went to West Kirby for the afternoon which brought a very welcomed breeze from the stuffy heat we've been experiencing. Toby really enjoyed watching the water and dipping his toes in. There were lots of dogs about which he loved too. His language has come along brilliantly over the last week. He has started saying so many new words-it amazes me how much he actually knows and understands, and is now communicating. Joseph wasn't in the best of moods which meant the trip was cut short.


Anyway, with Toby in nursery today I had chance to do a bit of crafting. So today I have been busy painting my box of treats from Wood be nice and crafty bugs. Watch this space for completed items...

Sunday, 18 August 2013

Personalised plaque / sign new baby

Thought I would share a commissioned personalised door sign and plaque that I made. This was for a friend to send to America for her brother who just had a little baby girl.

I used one of my bulk-bought plaques from ebay without holes drilled. Since I bought my dremel 3000 I wont buy them with the holes pre-drilled as sometimes I make something and decide that I prefer it not to have twine poking through at the front. With baby gifts, for example, I find that it a more eloquent finish can be achieved by attaching ribbon to the back of the sign using double sided tape.


I wanted to create a border on this sign as I wanted it to be quite plain, but eye catching nonetheless. I spray painted the entire plaque in white and left it dry. I then used making tape to section off the border. I was worried that the masking tape would pull up the paint when I took it off so I only placed the masking tape down loosely. When I pulled it up I realised the paint had seeped under the masking tape. Initially I was mortified but after leaving it to dry and them going back to it I decided I actually really liked it. It kind of gave it a a torn paper feel. Anyway, I spray painted my letters and hearts, measured out where I wanted them placed and then glued them down with super glue. To attach the ribbon to hang the sign I placed some double sided tape at either end of the plaque vertically (from top to bottom) and stuck the ribbon in place.


For the details plaque I used my Kobra spray paints again, and wooden bear shape bought off ebay and a heart embellishment bought from Debs cards & crafts (unfortunately now closed down).