Just a quick one tonight. Wanted to show you all a card I made for a fellow cleft mum who happens to live around the corner from me.
It's simple blue craft card at layered with silver card. I cut the outer square using my scallop-edged scissors and used a scalloped punch and circle punch for the inner circles. I added small white dots using my soufflé gel pen for a little extra decoration and finally added two little feet painted blue as the main embellishment. Oh, I stamped it using a felt tip pen with 'congratulations. I was really pleased with the layout.....just disappointed with the stamp, again! I have been and got some stazon ink pads today though so fingers crossed for a happier stamping future! :o)
Thursday, 15 August 2013
Tuesday, 13 August 2013
How to decorate a wooden wine box using the tracing technique
Remember that wine box I bought from the car boot sale a couple of weeks ago? Well, I found some time to decorate it. I decided to try decorating by hand using the retro-school tracing technique. I'll show you how....
I started by painting the box using a sample pot of coloured emulsion paint from B&Q (£1.10 a tub) in olive green. I gave it two thin coats, but I think one would have been fine. I decided not to paint the I side of the box as I will fill it with straw to present the wine so it wouldn't be seen anyway. Actually, the truth is I was too keen to crack on with it. If I were to sell this I think i'd paint the inside too.
Using Microsoft publisher I created a rectangle shape the same size as the lid on the box. This meant I could position the text and resize the font so that it was central and looked good. I messed around with the font until I found one I was happy with and then printed it off and cut it out. I deliberately choose a skinny font. I wanted it to look like handwriting, but neat.
I then coloured over the back of the writing with a pencil. This gave me flashbacks to rainy schools spent tracing ridiculously detailed images from textbooks and transferring them into exercise books.
Once coloured I turned it back around and stuck it in place on the lid using a piece of masking tape. This ensured the paper stayed in place as I tried to trace it into my box. I then drew around each of the letters using a biro which transferred the pencil markings underneath to the wood.
I peeled away the paper to reveal the writing in light pencil.
I carefully coloured in the writing with a super fine paintbrush. This was my main mistake. I really do not have a stead enough hand for a paintbrush. Really I should have used my uni posca paint pens, but they don't offer the variety of colours I want to work with. So, I either need to learn to steady my hand, find an super-duper-fine paint brush, or fork out for a bucket load of paint pens from somewhere. Practise makes perfect as they say....
It didn't look great. It looked unfinished. I umm'ed and arr'ed for ages about whether to go Around the letters with a black marker or not. Eventually I decided that since I didn't like it as it was, I couldn't make it worse. So I went ahead. Still, it looked "dodgy" to say the least. I persevered with it as i thought whilst it looked a bit odd, once finished it may add character. I'm glad I did because I actually really like the finished item.
The next decision was the embellishments. It definitely needed something but I couldn't decide what looked best:
Finally I bit the bullet and went for the stars. I painted them in the same colour I'd used for the letters, outlined them using my fine liner too, and then stuck them on using superglue. Voila!
I started by painting the box using a sample pot of coloured emulsion paint from B&Q (£1.10 a tub) in olive green. I gave it two thin coats, but I think one would have been fine. I decided not to paint the I side of the box as I will fill it with straw to present the wine so it wouldn't be seen anyway. Actually, the truth is I was too keen to crack on with it. If I were to sell this I think i'd paint the inside too.
Using Microsoft publisher I created a rectangle shape the same size as the lid on the box. This meant I could position the text and resize the font so that it was central and looked good. I messed around with the font until I found one I was happy with and then printed it off and cut it out. I deliberately choose a skinny font. I wanted it to look like handwriting, but neat.
I then coloured over the back of the writing with a pencil. This gave me flashbacks to rainy schools spent tracing ridiculously detailed images from textbooks and transferring them into exercise books.
Once coloured I turned it back around and stuck it in place on the lid using a piece of masking tape. This ensured the paper stayed in place as I tried to trace it into my box. I then drew around each of the letters using a biro which transferred the pencil markings underneath to the wood.
I peeled away the paper to reveal the writing in light pencil.
I carefully coloured in the writing with a super fine paintbrush. This was my main mistake. I really do not have a stead enough hand for a paintbrush. Really I should have used my uni posca paint pens, but they don't offer the variety of colours I want to work with. So, I either need to learn to steady my hand, find an super-duper-fine paint brush, or fork out for a bucket load of paint pens from somewhere. Practise makes perfect as they say....
It didn't look great. It looked unfinished. I umm'ed and arr'ed for ages about whether to go Around the letters with a black marker or not. Eventually I decided that since I didn't like it as it was, I couldn't make it worse. So I went ahead. Still, it looked "dodgy" to say the least. I persevered with it as i thought whilst it looked a bit odd, once finished it may add character. I'm glad I did because I actually really like the finished item.
The next decision was the embellishments. It definitely needed something but I couldn't decide what looked best:
Finally I bit the bullet and went for the stars. I painted them in the same colour I'd used for the letters, outlined them using my fine liner too, and then stuck them on using superglue. Voila!
Day trip, crafty buys and kind words...
I took my mum and granny out on a day trip to Llandudno today with the boys.
For those who haven't been before its a lovely little place on the north wales coastline with an abundance of things to do. There's the beach and promenade, the town centre, the Great Orme tramline and the welsh mountain zoo a stones throw away. We went for..... The craft shop!!
Tucked away amongst a road full of cheap, seaside-shops is the most amazing craft clearance shop! They've got stacks of fab bits at really really cheap prices. I think I spent about £12 and got this whole pile of goodie:
I even picked these 12x12 Dovecraft Christmas papers up for £1 each!!! Bargain!
I could easily have bought more, but the kids were playing up so I had to be quick. The shop is in the process of developing its websites I when it's up and running I'll post a link.
Despite these bargains the best part of the day was something a stranger said to me. Something which I (do actually) realise every day.....
I was waiting outside Marks and Spencer's for mum and granny and a man came over and smiled at the boys. He asked how old they are and said how lovely they seemed. There was one or two other small comments made before I spotted my mum, but just before he walked off he told me "you're very wealthy!". I knew instantly he didn't mean financially. He was referring to my boys and their worth. "I am," I replied walking off, "I am VERY wealthy".
For those who haven't been before its a lovely little place on the north wales coastline with an abundance of things to do. There's the beach and promenade, the town centre, the Great Orme tramline and the welsh mountain zoo a stones throw away. We went for..... The craft shop!!
Tucked away amongst a road full of cheap, seaside-shops is the most amazing craft clearance shop! They've got stacks of fab bits at really really cheap prices. I think I spent about £12 and got this whole pile of goodie:
I even picked these 12x12 Dovecraft Christmas papers up for £1 each!!! Bargain!
I could easily have bought more, but the kids were playing up so I had to be quick. The shop is in the process of developing its websites I when it's up and running I'll post a link.
Despite these bargains the best part of the day was something a stranger said to me. Something which I (do actually) realise every day.....
I was waiting outside Marks and Spencer's for mum and granny and a man came over and smiled at the boys. He asked how old they are and said how lovely they seemed. There was one or two other small comments made before I spotted my mum, but just before he walked off he told me "you're very wealthy!". I knew instantly he didn't mean financially. He was referring to my boys and their worth. "I am," I replied walking off, "I am VERY wealthy".
Sunday, 11 August 2013
Disney Countdown Sign
We are going to Disney World Florida in October as a celebratory treat to mark the end of a year of operations for Joseph. We booked it shortly after we found out that our baby would have a cleft lip and palate while I was pregnant. The most difficult thing to come to terms with was the fact that my poor little baby would have to go through the pain of the operations. We knew feeding was going to be more difficult than it would be with a non-cleft baby and we just felt that we could do with something to look forward to after dealing with all the difficulties we would face.
I was lucky enough to visit twice as a child but my partner Simon has only ever been to EuroDisney. He is Disney crazy and always buying the boys DVDs and popping into the Disney store to buy them little treats. Needless to say he is VERY excited about the holiday. As I've said before he regularly rolls his eyes when I try to talk to him about my ideas or makes so I thought I would test him..... and I made him this countdown plaque:
I actually made two and gave him the choice of which to use. He said he wanted both! :o) so the small one has been made into a magnet and put on the fridge and the larger one is on the kids bedroom door. You can't see it in the picture but there us a stick of chalk attached to the string that holds the sign up.
The plaques were bought from the same seller on ebay - I negotiated the price for buying them in bulk and with the holes pre-drilled. They were painted using my Kobra spray paint. The Mickey Mouse head shape was bought from my trusty LaserSmith and painted with chalk paint bought from hobbycraft. They were glued on using Gorilla superglue and the writing and decorating was completed using my uni posca paint pens.
It took about 30 minutes to make both of them and that included paint drying time. Simples!!
Princess Crown Wooden Sign
A fellow cleft mum has been having a hard time of things lately and her little girl recently went through her palate repair operation. Through all the difficulties she is facing she continues to work for clapa in her fundraising efforts and has applied to become a contact parent for clapa, which means she will act as a point of contact for new/ other cleft parents that may need help with their babies. I thought she could do with a few bits to cheer her up so I made this little Crown Wooden Sign for her daughter.
I always spray both sides of the plaque-even when the back is unlikely to be seen. I think it looks more professional. I ordered some items from some established crafty pages off facebook and was really disappointed when they arrived and were only painted on the embellished side. Especially as it was an item where the back could be seen, I.e. on a freestanding shape! You MUST make sure it is thoroughly dry before attempting to paint the other side though. If you have sprayed a thick coat (as I always end up doing because I'm too inpatient) I recommend waiting a good few hours before turning around to spray the back. However, it is a better recommendation to use the spray paint as instructed on the tin and just do several thin coats as it dries much quicker this way.
I glued the embellishments in place using superglue (I have found this gives a much better finish that a hot glue gun as it doesn't ooze out of the sides and it sticks well without the need to clamp it together for half an hour after gluing - can you tell I am impatient?)And those of you with eagle eyes may have noticed that there have been holes drilled into 2 of the crowns peaks. To do this I used my Dremel 3000 (see, it was an essential buy afterall :o)!)
So that my lovely CLAPA friend knew why the devil she was receiving this gift I also made her a card...
Both the Crown shape and letters were bought from my favourite craft shape supplier LaserSmith. The heart was bought off ebay as bulk buy of 50, and the small stars were bought as a mixed box of embellishments from hobbycraft.
I started by placing my bits on the plaque to check they fit and see how they looked best. I planned to paint it with my Kobra spray paint in pink.
So that my lovely CLAPA friend knew why the devil she was receiving this gift I also made her a card...
![]() |
| I would like to enter this card into the One Stop Craft Challenge Challenge #238 - Pastel Colours |
It was a pig to try to photograph this card. I love the design, but again I am disappointed with the stamped sentiment, which reads 'THINKING OF YOU'..... YOU NEED NEW INK PADS :o)
I did it.....
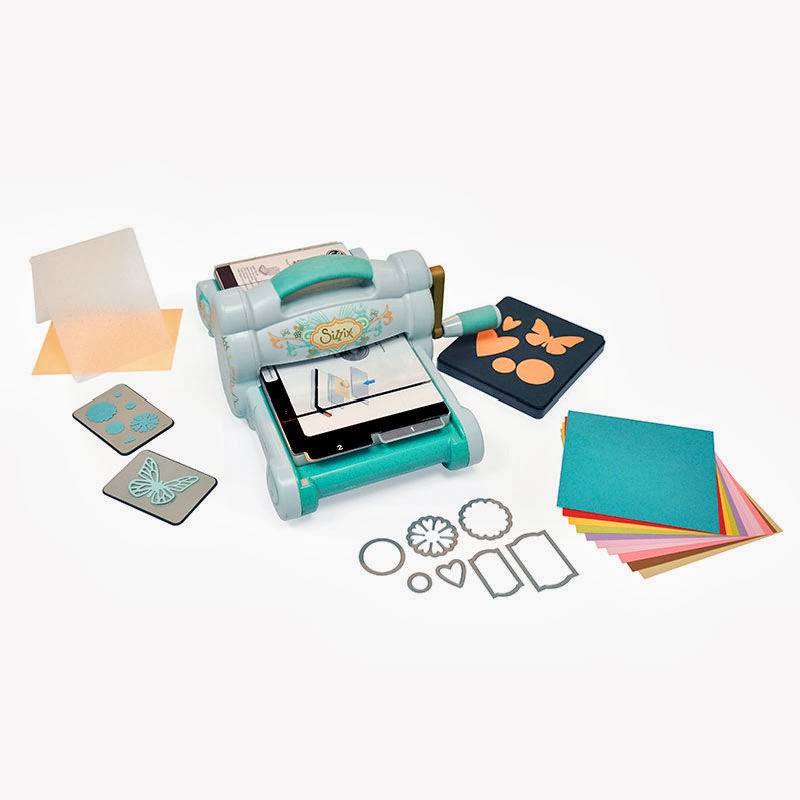
..... I bought the sizzix big shot!! I can't wait to get using it!
However it'll have to wait until tonight as I'm off to start a new career venture....as a massage therapist :o) whilst my partner rolls his eyes at my idea I am determined to be able to look after my kids without having to ship them off to nursery full time!
Friday, 9 August 2013
Personalised canvas wall art gift
My work in progress is now a work complete, and one I am very pleased with:
I really should have measured the space before I ordered my embellishments as I think it is a little bit too small. Having said that, I have had this out in a spot where I see it daily and the more I see it the more I like it!
After putting the Whale and letters in place it looked like it was missing something:
So I added my trademark dotted border around the outside. I liked it, but still thought it could do with something else. So I carried on with the dots. First around the letter J, then around the smaller letters and finally around the whale. You can't see it very clearly on the main picture so here is a close up:
I love it! Can't wait to make more :o)
Subscribe to:
Posts (Atom)